Wednesday 19 September 2012

How to check Malware injection in Code

To check Malware injection in your script/Code you can use a Web based Google Tool called “Webmasters Tools”

You can find it here Google Webmasters Tool

You just need to login with any of your Google Logins.
Click on  to add the Website to Google Webmasters Tools
After Adding the Website,You’ll get the below given screen.


Now,Download the HTML file and paste it into your root directory of your domain.
Next,Access the click to verify.
Later,Click on Verify.Now You are done adding your website to Google Webmasters.
Now,To check the injection just click on the Option “Health>>Malware” on left panel options.


Here you will find the files that are been injected.

When you click on the link/file where the Code has been injected.You get the below given screen


 Here you even get the injected script which later you can remove from the file.

How to improve internet speed on your Windows XP Desktop

Following steps will help you to improve the internet speed of Windows XP

Step 1:

Click Start => Run => type “gpedit.msc” without quotes and then press enter. A group policy editor will be opened.

Step 2:

Then go to: Local Computer Policy => Computer Configuration => Administrative Templates => Network => QOS Packet Scheduler => Limit Reservable Bandwidth (Double click on it)

Step 3:

When you double click on Limit Reservable Bandwidth it will say it is not configured. But the truth is under the ‘Explain’ Tab i.e.”By default, the Packet Scheduler limits the system to 20% of the bandwidth of a connection but you can use this setting to override the default.” So the trick is to ENABLE reservable bandwidth, then set it to ZERO. This will allow the system to reserve nothing, rather than the default 20%.

How to Change RDP Port

The setting for the Terminal Services port lives in the following registry key:
HKEY_LOCAL_MACHINE\SYSTEM\CurrentControlSet\Control\TerminalServer\WinStations\RDP-Tcp

Open up Regedit, find this key, and look for the the PortNumber value.

 Double click on the PortNumber setting and enter in the port number you wish to use. Unless you think in hex (pat yourself on the back if you do), you might want to click on decimal before entering your new port number.

 Or, you can use my creatively named VelocIT Terminal Services Port Changer application, which is available with source.  This is a simple five minute application that does one thing and one thing only. It allows you to change the port number that Terminal Services listens on.


Remember, all the usual caveats apply about tinkering with the registry. You do so at your own risk.

Connecting via Remote Desktop to the non-standard Port

Now that you have the server all set up, you need to connect to it.  This is pretty easy.  Suppose you change the port for the virtual machine to listen in on port 3900.  You simply append 3900 to the server name (or IP) when connecting via Remote Desktop.

Could not load type ‘System.ServiceModel.Activation.HttpModule’

Error:

Could not load type ‘System.ServiceModel.Activation.HttpModule’ from assembly ‘System.ServiceModel, Version=3.0.0.0, Culture=neutral, PublicKeyToken=b77a5c561934e089′.
Description: An unhandled exception occurred during the execution of the current web request. Please review the stack trace for more information about the error and where it originated in the code.
Exception Details: System.TypeLoadException: Could not load type ‘System.ServiceModel.Activation.HttpModule’ from assembly ‘System.ServiceModel, Version=3.0.0.0, Culture=neutral, PublicKeyToken=b77a5c561934e089′.
Resolution

To resolve this issue, run the following from command line:

aspnet_regiis.exe /iru

The aspnet_regiis.exe file can be found in either

    %windir%\Microsoft.NET\Framework\v4.0.30319
    %windir%\Microsoft.NET\Framework64\v4.0.30319 (on a 64-bit machine)

Tuesday 18 September 2012

Windows Login Error: An unauthorized change was made to Windows

After Log in to Windows Getting error  “An unauthorized change was made to Windows

Resolution:

1) Click the option that launches an Internet Browser

2) Type: %windir%\system32 into the address field

3) Find the file cmd.exe

4) Right-click on cmd.exe and select Run as Administrator

5) Type:  cscript %windir%\System32\slmgr.vbs /ilc %windir%\System32\licensing\ppdlic\Security-Licensing-SLC-ppdlic.xrm-ms

6) Hit the Enter key

7) Reboot

Later,Go to your system options and Update your Windows License Key and also run if any Windows Updates are available.

Monday 17 September 2012

How to Configure SmarterMail 9 site in IIS7

1. Connect via Remote Desktop


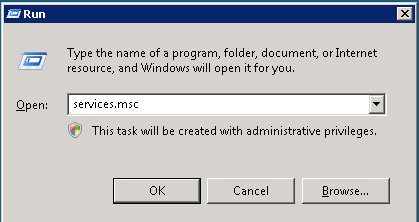
2. Start > Run > services.msc


3. Right-Click SmarterMail Web Server and Select Properties 

 4. Select Disabled from the Startup type drop-down, Click Stop and Click OK 


5.Close the Services window

6.Open IIS, Start > Run > inetmgr

 7. Select your Server Name and Double-Click ISAPI and CGI Restrictions 


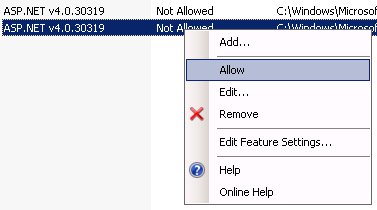
8. For Each ASP.NET v4.0 entry Right-Click and Select Allow 

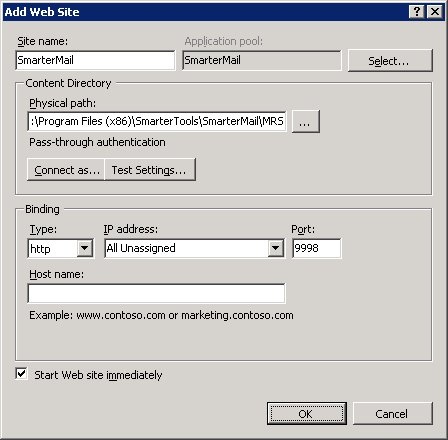
 9. Expand your Server Name, Right-Click on Sites and Select Add Web Site 

 10.Enter a site name e.g. SmarterMail

 11.Enter Physical Path to SmarterMail installation e.g. C:\Program Files (x86)\SmarterTools\SmarterMail\MRS

 12.Enter Port 9998 and Click OK 

 13. Select Application Pools 

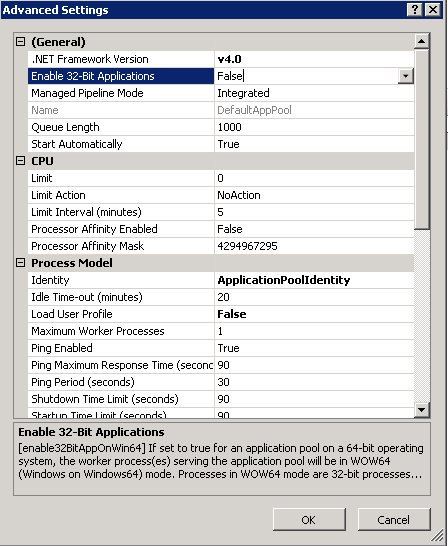
 14. Right-Click SmarterMail application pool and Click Advanced Settings 

 15.Select v4.0 from the .NET Framework Version drop-down

 16. Set the Managed Pipeline to Integrated 


17. SmarterMail should now be accessible at http://127.0.0.1:9998 as well as http://1.2.3.4:9998 where 1.2.3.4 is your IP address

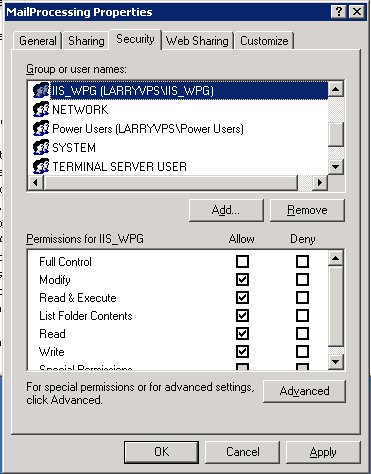
18. For attachments to work properly ensure the Network Service and IIS IUSR users have Modify permissions for the /MailProcessing and /App_Data folders usually located in C:\Program Files\SmarterTools\SmarterMail\MRS 


Back up all MS SQL databases at once

This article will discuss how to backup all MS SQL databases with one script. A separate file will be created for each database.
  1. Log into your server through Remote Desktop Connection.
  2. Open SQL Server Management Studio and select the server name.
  3. Click the New Query button and enter in the following data:
  4. DECLARE @name VARCHAR(50) -- database name 
    
    DECLARE @path VARCHAR(256) -- path for backup files 
    
    DECLARE @fileName VARCHAR(256) -- filename for backup 
    
    DECLARE @fileDate VARCHAR(20) -- used for file name 
    
    SET @path = 'C:\Backup\' 
    
    SELECT @fileDate = CONVERT(VARCHAR(20),GETDATE(),112) 
    
    DECLARE db_cursor CURSOR FOR 
    
    SELECT name 
    
    FROM master.dbo.sysdatabases 
    
    WHERE name NOT IN ('master','model','msdb','tempdb') 
    
    OPEN db_cursor 
    
    FETCH NEXT FROM db_cursor INTO @name 
    
    WHILE @@FETCH_STATUS = 0 
    
    BEGIN 
    
     SET @fileName = @path + @name + '_' + @fileDate + '.BAK' 
    
     BACKUP DATABASE @name TO DISK = @fileName 
    
     FETCH NEXT FROM db_cursor INTO @name 
    
    END 
    
    CLOSE db_cursor 
    
    DEALLOCATE db_cursor 
    
  5. Make sure that the directory in the SET @path line exists. If the directory (in this case C:\Backup) does not exist, create the directory else the script will fail.
  6. Click the Execute! button and the script will execute.
  7. Once finished, a dialog box will appear stating such. Now all databases are backed up in C:\Backup with the database name as the file name.

    To take the full backup of all the databases in MS SQL server :

    1. Log into your server through Remote Desktop Connection.
    2. Open SQL Server Management Studio and select the server name.
    3. Click the New Query button and enter in the following data:
      -----------------------------------------------------------------
      DECLARE @BackupFile varchar(255), @DB varchar(30), @Description varchar(255), @LogFile varchar(50)
      DECLARE @Name varchar(30), @MediaName varchar(30), @BackupDirectory nvarchar(200)
      SET @BackupDirectory = 'C:\Backup\'
      --Add a list of all databases you don't want to backup to this.
      DECLARE Database_CURSOR CURSOR FOR SELECT name FROM sysdatabases WHERE name <> 'tempdb' AND name <> 'model' AND name <> 'master'
      OPEN Database_Cursor
      FETCH next FROM Database_CURSOR INTO @DB
      WHILE @@fetch_status = 0

          BEGIN
              SET @Name = @DB + '( Daily BACKUP )'
              SET @MediaName = @DB + '_Dump' + CONVERT(varchar, CURRENT_TIMESTAMP , 112)
              SET @BackupFile = @BackupDirectory + + @DB + '_' + 'Full' + '_' +
                  CONVERT(varchar, CURRENT_TIMESTAMP , 112) + '.bak'
              SET @Description = 'Normal' + ' BACKUP at ' + CONVERT(varchar, CURRENT_TIMESTAMP) + '.'

              IF (SELECT COUNT(*) FROM msdb.dbo.backupset WHERE database_name = @DB) > 0 OR @DB = 'master'
                  BEGIN
                      SET @BackupFile = @BackupDirectory + @DB + '_' + 'Full' + '_' +
                          CONVERT(varchar, CURRENT_TIMESTAMP , 112) + '.bak'
                      --SET some more pretty stuff for sql server.
                      SET @Description = 'Full' + ' BACKUP at ' + CONVERT(varchar, CURRENT_TIMESTAMP) + '.'
                  END   
              ELSE
                  BEGIN
                      SET @BackupFile = @BackupDirectory + @DB + '_' + 'Full' + '_' +
                          CONVERT(varchar, CURRENT_TIMESTAMP , 112) + '.bak'
                      --SET some more pretty stuff for sql server.
                      SET @Description = 'Full' + ' BACKUP at ' + CONVERT(varchar, CURRENT_TIMESTAMP) + '.'
                  END
                  BACKUP DATABASE @DB TO DISK = @BackupFile
                  WITH NAME = @Name, DESCRIPTION = @Description ,
                  MEDIANAME = @MediaName, MEDIADESCRIPTION = @Description ,
                  STATS = 10
              FETCH next FROM Database_CURSOR INTO @DB
      END
      CLOSE Database_Cursor
      DEALLOCATE Database_Cursor
      -----------------------------------------------------------------
    4. Make sure that the directory in the SET @path line exists. If the directory (in this case C:\Backup) does not exist, create the directory else the script will fail.
    5. Click the Execute! button and the script will execute.
    6. Once finished, a dialog box will appear stating such. Now all databases are backed up in C:\Backup with the database name as the file name.

How to Install Smartermail 9

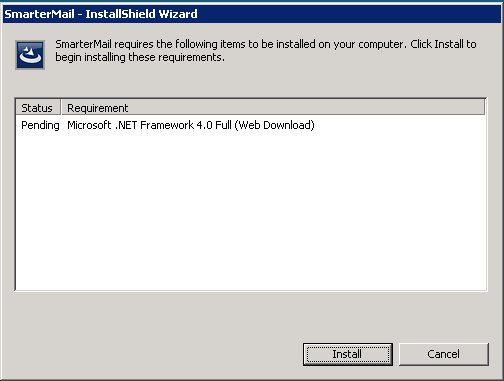
This article walks you through the installation of SmarterMail 9 on your Windows server. Please note that Smartermail 9 requires ASP.net 4.0. If do not have this installed then Smartermail will attempt to install it before continuing to install Smartermail.
  1. Download SmarterMail 9 from Smartertools.com
  2. Run the SmarterMail9_Setup.exe installer
  3. If you do not have .NET 4.0 installation SmarterMail will attempt to install the required components. 

4. Click Next. 


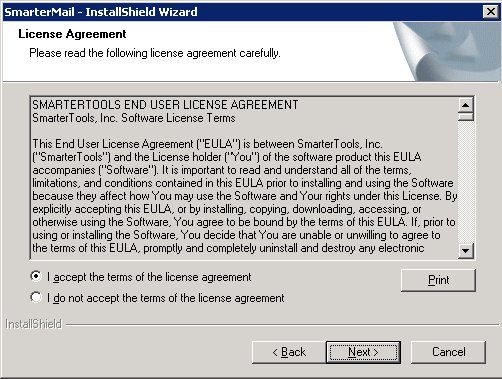
5. Select "I accept the terms of the license agreement" and Click Next. 


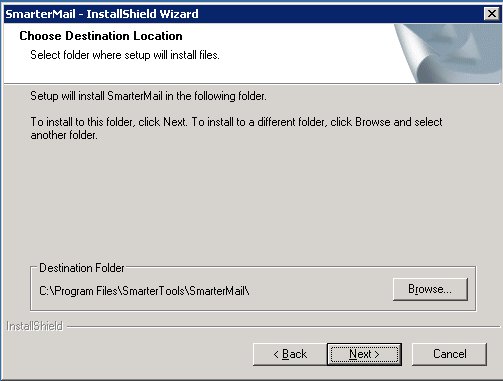
6. Click Next. 


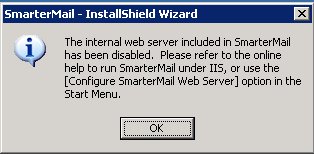
7. Click OK. 


8. Click Finish. 

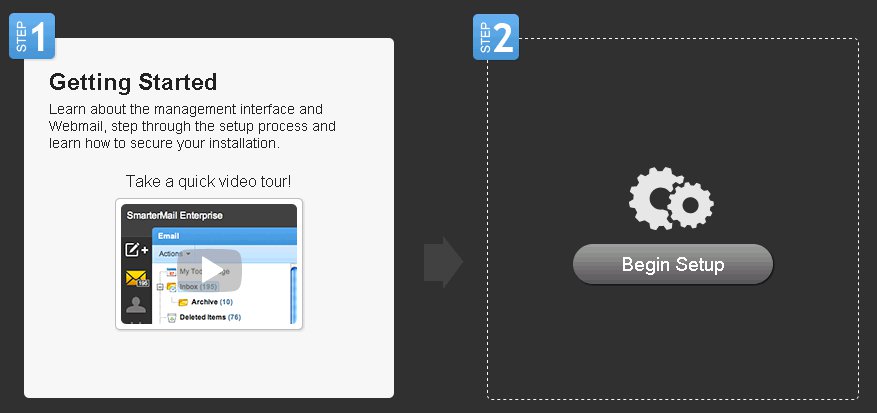
 9. Click Begin Setup. 


10. Enter your License Key or leave blank for FREE Edition and Click Next.


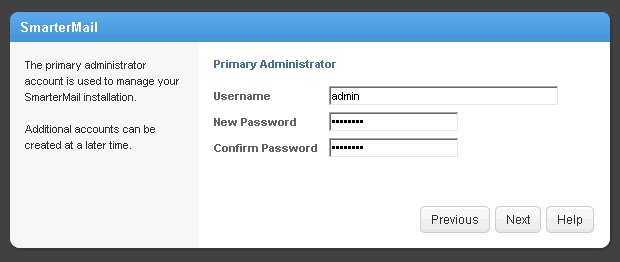
11. Enter a secure password (Minimum of 8 characters in length including upper and lower case, numerals, and punctuation) and Click Next.


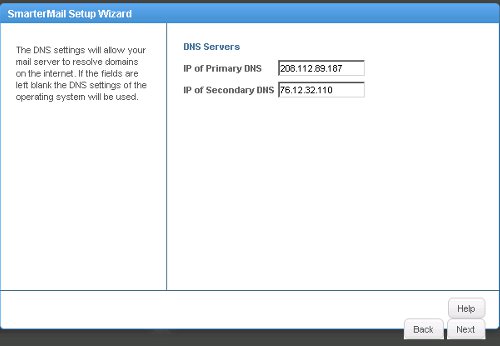
12. Enter a Hostname which is a fully qualified domain that resolves back to the server IP E.g.: mail.domain.com, select the primary IP address, and enter 208.112.89.187 and 76.12.32.110 for Primary/Secondary DNS and Click Next. 


13. Click Next.


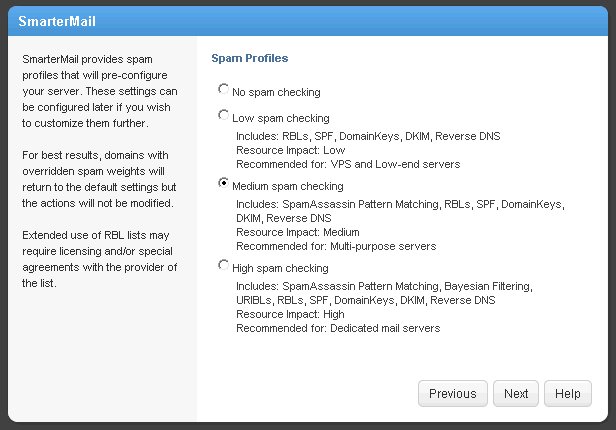
14. Select your Spam Filtering Level and click Next.


15. If you wish to enable ClamAV or enable greylisting check the box and Click Finish. 


16. SmarterMail 9 is now successfully installed.

Thursday 13 September 2012

Back up Windows Server 2003 Registry

How to create a full backup of the registry and system state data in Windows 2003
To back up the system state (including the registry hives system, software, security, the Security Accounts Manager (SAM), and the default user (but not HKEY_CURRENT_USER)), follow these steps:
  1. Click Start, point to All Programs, point to Accessories, point to System Tools, and then click Backup. The Backup or Restore Wizard starts.
  2. Click Advanced Mode.
  3. Click the Backup tab.
  4. On the Job menu, click New.
  5. Click to select the System State check box.
  6. Click to select the check boxes next to any other files, folders, or drives that you want to back up.
  7. In the Backup destination box, choose "File".
  8. In the Backup file name box specify a path and file name for the backup (.bkf) file. Or, click Browse, specify a file name and location where you want to save the file, and then click Save.
  9. On the Tools menu, click Options. Specify any additional backup options that you want on the appropriate tabs of the Options page. Click OK.
  10. Click Start Backup.
  11. If you want to set advanced backup options, such as data verification or hardware compressions, click Advanced. Specify the options that you want, and then click OK.
  12. Review the settings on the Backup Job Information page. Specify whether you want this backup to replace the information that is already present on the destination media, or add this backup to the existing information.
  13. Click Start Backup.

Map Local Drives through Remote Desktop

By enabling local drives in your remote desktop connection you are able to transfer files between your local and remote computer.

1. Open Remote Desktop; click Start, go to Run and type mstsc press Enter


2.From the RDC application, click Options>>
3.Click on the Local Resources tab.
4.Under Local devices check the Disk drives check box.


5.Click Options << to return to the connection screen or click Connect if you already had your host typed in
 

Stopping Unneeded Services In Windows Server 2008

By  default Windows 2008 starts with a number of services that actually do not need to be running. Many of these services can impact performance and can also compromise security on your server. This article identifies some of these services and lets you know which ones are safe to disable.

Services That Can Be Disabled

The services in question here will be the ones that Windows 2008 sets up as an automatic service, which means as soon as your server is powered on, they start. Our goal is to stop as many services as possible without disabling any needed services for the server.
To get started, log onto your Windows 2008 server. Once you are logged in, there are two ways to get to the services. The first is to navigate to Start > Administrative Tools > Services, while the other is to simply go to your run command prompt, type "services.msc" and then press enter. Now that you are at the services, you can begin.
  • DHCP Client - Registers and updates IP addresses and DNS records for this computer. If this service is stopped, this computer will not receive dynamic IP addresses and DNS updates. If this service is disabled, any services that explicitly depend on it will fail to start. Since we don't run DHCP on our servers, this can be disabled.

  • DNS Client - The DNS Client service (dnscache) caches Domain Name System (DNS) names and registers the full computer name for this computer. Since Hosting.com provides you with DNS servers there is no need to have this enablked. However if you plan on running your own DNS server this will need to active.

  • Distributed Link Tracking Client - Maintains links between NTFS files within a computer or across computers in a network. Unless you are running an Active Directory Domain, this service is not needed.

  • Human Interface Device Access - Enables generic input access to Human Interface Devices (HID), which activates and maintains the use of predefined hot buttons on keyboards, remote controls, and other multimedia devices.  This can safely be disabled for a Virtual Server, however Dedicated Server users may want to keep this enabled.

  • IP Helper - Provides tunnel connectivity using IPv6 transition technologies (6to4, ISATAP, Port Proxy, and Teredo), and IP-HTTPS. Since Hosting.com is currently not using or offering IPv6, this service can be stopped.

  • Network Location Awareness - Collects and stores configuration information for the network and notifies programs when this information is modified. If you use the Windows 2008 Advanced Firewall, you will may not want to disable this service as it provides the firewall with specific settings. However if you are not using Windows Advanced Firewall or have a hardware firewall then you can safely disable this.

  • Print Spooler - Loads files to memory for later printing. Unless you are setting up remote printing, this service can be disabled.

  • Windows Error Reporting Service - Allows errors to be reported when programs stop working or responding and allows existing solutions to be delivered. Also allows logs to be generated for diagnostic and repair services. Service is not needed and can safely be stopped.

  • Windows Firewall - Windows Firewall helps protect your computer by preventing unauthorized users from gaining access to your computer through the Internet or a network. It is important that any server that is exposed to the internet to also have a firewall running. However if you are using a hardware firewall, this can be disabled.

  • Windows  Audio - Manages audio for Windows-based programs.  If this service is stopped, audio devices and effects will not function properly. Since your server is not local, there is little need to have audio services running on it. If you are rnning a media services such as Windows Media Server or Shoutcast, this will have no impact since the audio from the media server is sent to the client. This can safely be disabled.

Create a scheduled task in Windows Server 2008

  1. Log into your server through Terminal Services or Remote Desktop Connection
  2. Navigate to Start > All Programs > Administrative Tools > Server Manager. This brings you to the Server Manager interface
  3. Drill down to Configuration > Task Scheduler 
    4.On the right hand side of the interface, click Create Basic Task… Give the task a name and description. Click Next  
    5.Select the radio button for how often the task should run: Daily, Weekly, Monthly, one time only, when the computer starts, when I log in, or when a specific event is logged. Click Next


    6.Select a start time, how often to perform the task, and an end time. Click Next  


    7.
    Configure the task to Start a Program, Send an e-mail, or display a message by selecting the appropriate radio button. Click Next

     
    8. Browse to the program or script and enter in any arguments or paths to start in. For example to run a command prompt, enter in C:\Windows\System32\cmd.exe. Click Next

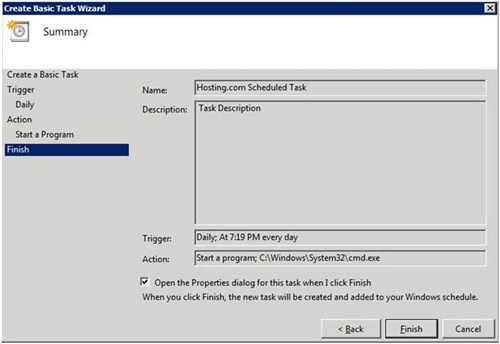
    9. Select the checkbox for Open the Properties dialog for this task when I click Finish if you wish to configure the task further. Click Finish  


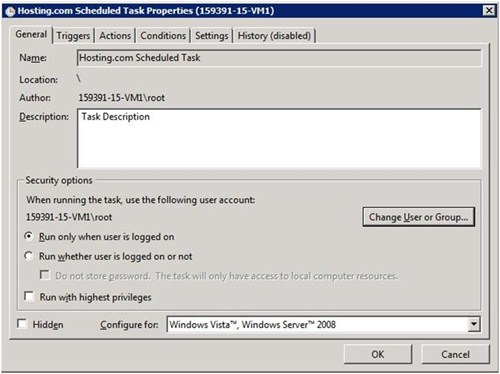
    10.The Advanced Properties window will appear. Configure the task further to your liking by adding comments to the task, telling the task when to run (only if logged in or otherwise), deleting the task after its run if it's scheduled to not run infinitely, to reschedule the task if it is missed, and so forth. After doing so, the task is setup and will run if configured properly

Adjust Page File / Virtual Memory on Server 2008

Before making any changes we strongly suggest reading the following guide from Microsoft on how to determine the appropriate page file size for 64-bit versions of Windows.

http://support.microsoft.com/kb/889654

Click Start > Right Click Computer > Select Properties


Click Advanced System Settings


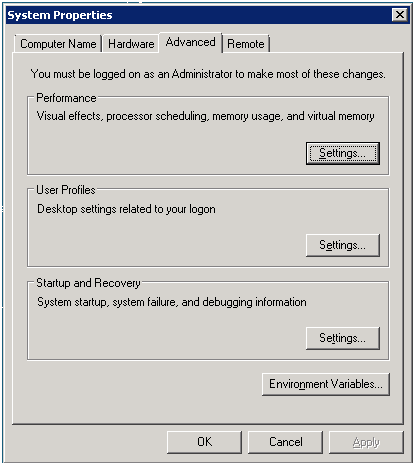
Select Advanced Tab and Click Settings Button


Click Advanced Tab


On this screen you can change how Windows handles processor importance, for Programs or Background Services.
"The processor scheduling section controls how much processor time Windows devotes to a program or process. The processor has a finite amount of resources to divide among the various applications. Choosing the Programs option will devote the most processor time to the program running in the foreground. Choosing Background Services allocates equal processor time to all running services. If have are experiencing slow-running programs, you could try setting the processor scheduling to Programs."
Click Change which will load the Virtual Memory Window


If you remove the check from 'Automatically manage paging file for all drives' you can set a custom size that you wish.
Note that any change you make here will require a restart of the server before changes can take place.