- Log into your Windows Server. Once you have logged in, click on "Start" > "Run" and type MMC and then press ok / enter.
- The Windows MMC (Microsoft Management Console) will appear. In the Console click "File" > "Add/Remove Snap-in".
- You will now need to browse for "IP Security Policy Management" and highlight it. Once it is highlighted, click "Add" that is located in the middle pane.
- You will need to select the computer or domain you want to add the snap-in for. Choose "Local Computer" and click "Finish".
- Now click "OK".
- You will be back at the console but you will now have "IP Security Policies on Local Computer" listed. Right click on "IP Security Policies on Local Computer" and then select "Create IP Security Policy".
-
You will now be at the IP Security Policy Wizard screen. Click Next to continue.
 8.You will now need to name your policy. For this article we are blocking an IP address, so call it "Block IP Address ", give it a description and then click "Next"
 9. You will be prompted to "Activate the default response rule", however this only applies to previous versions of Windows such as Windows Vista and Windows 2003. Leave this unchecked and click "Next
 10. You policy is now created. Click "Finish" to proceed.
 11. You will now be at the properties screen for your new policy. Click "Add" to continue.
 12. You will now be at the "Welcome to the Create IP Security Rule Wizard". Click "Next".
 13.You will now see the "Tunnel Endpoint" screen. Select "This rule does not specify a tunnel and click "Next".
 14. For your network type, select "All Network Connections and click "Next".
 15. You will now be at the "IP Filter List". Here you can specify the ruleset for your policy. You're your rule a name and click "Add" to setup a custom rule.
 16. You will now be able the IP Filter Description and Mirrored Property Screen. Leave the "Mirrored" option checked and click "Next".
 17. Now you will be able to select the source address for your rule. Since we want to block an IP Address, we need to select "A specific IP Address or Subnet".
 18. Once you select this rule, you will now be able to specify the IP or Range. Fill in the IP or Range and click "Next".
 19. Now we will need to select the "Destination Address". Change this to "My Address" and click "Next".
 20. You will need to specify the protocol. Select TCP and Click "Next".
 21. Now you can specify the port that you want to block the IP or IP's from accessing. This is very useful if you want to block HTTP or MSSQL, etc. For this example we will select HTTP so we will need to choose port 80. So leave the from port to "Any Port" and the to port at "To this Port" and fill the box with 80. Now click "Next".
 22.You will have now completed your rule. Click on "Finish" to close the wizard.
 23.Now you will need to enable the rule. To do this, make sure it is selected at the "IP Filter List". Then click "Next".
 24. Click "Add". You will be taken to the "IP Security Filter Action Wizard". Click "Next".
 25. You will need to name the Action. For this article we will call is Block IP. Then Click "Next"26. Now you will need to select the action behavior. You will have 3 chooses; Permit, Block or Negotiate Security. Choose "Block" and click "Next" and then at the next screen click "Finish".
 27.Make sure the IP Action is also selected and then click "Next"
 28.You will now be at the Policy Properties again. Make sure the new rule is selected and click "Apply" and then "OK".
 29. Finally you will be back at the console screen. Right click on the new policy and click "Assign". This will activate the rule.
 You have successfully created an IPsec policy and activated it.
How to Block an IP Address using IPSec on 2003
This article will walk you through how to block an individual IP address from accessing your server, using an IPSec Security Policy.
For various reasons, you may find yourself wanting to block a specific IP address from accessing your server.
Simply following these instructions showing how to create an IPSec Security Policy specifying to block access to a specific IP address.
1. Click on the Start Menu and Click on Run.

2. Type "secpol.msc" and Click OK.

3. When the Local Security Settings console opens, Click on "IP Security Policies on Local Computer".

4.Right Click in the Right Window Pane and Click "Create IP Security Policy".

5.Click Next when the Wizard opens.

6. Here you can name your new IPSec Security Policy. In this example, we named it "Blocked IPs". When you are ready, Click Next.

7. Uncheck the box for “Activate the default Response Rule” and then click Next Button..

8. On the Next screen remove the check for Edit Properties and Click Finish. 9.Once you click on the Finish Button you will see the screen below along with your rule being added to the list. Now we will create an IP filter list to block IPs.
 10.Double click on the rule you have just create to open the properties window:
 11. Since we have chosen to uncheck “Activate the default Response Rule” in Step 7 the Dynamic rule in not applied. Click on Add button to open Security Rule Wizard and Click again on Add button to open IP Filter List Wizard.
 12. You will have a screen some what in Figure 12. Put in the name of your list and Click on the Add button.
 13. This will open another window for you to add IP and ports in the IP Filter list. In the Description box just put in the IP address that you want to block and make sure that you keep the check on the box for “Mirrored. Match packets with the exact appropriate source and destination addresses” and click on the Next button.
 14. Select My IP address in the Sources Address from the drop down list.
15. You have many more options to select from the list for both in Sources and Destination Address. You will need some advanced knowledge to work with those option. We will select My IP address for now and click on Next button. 16. In the IP Traffic Destination, select “A specific IP Address” and enter the IP address that you want to block on your machine. Here you can also select a sub net from the drop down and block the entire subnet. Once you finish entering an IP/Subnet, click on Next button.
 17.Here in IP Protocol Type you can define the protocol that you want to block, it can be any one from the list for example TCP, UDP, ICMP etc. We will select ANY which mean all connect from a specific IP address. If you select a protocol from the list andclick Next it will ask you to enter the port address that you want to block, example 80 (See Figure 17.2). But since we want to block all ports we will select Any and click Next (Figure 17.1) and then Finish.
 18. After you click on Finish button you will see that the rule has been added in the IP filter list. If you want to add more IP and subnets then click on the Add button to add another rule or block 2nd IP. Once you finish with it you will have rules as in Figure 18.2.
 19. Once your IP Filter List is complete click on the OK button to get back Security Rule Wizard. Select the IP filter list which you have created by clicking on the radio button and click Next.
20. In the Next screen of Security Rule Wizard you will not see any Filter Action as Block as by default it is not created. We will create a Filter action to block connect by click on Add button. 21.In the Name type “Block” and any discryption you like and click on Next.
 22. In Filter Action General options select Block and click Next.
 23.And then on Finish to get back to Security Rule Wizard.
 24. This will add the Filter option as Block in the list, just click on radio button to select it and click Next.
 25. Click Finish to complete the security Rule Wizard.
 26. You will see the rule added in the list, you can add more rule with the same steps. Now just click OK to finish with the rules.
 27.Now since we have already created the rules to block desired IP address just right click on the IP Security Policy and select Assign to apply the rule on the server.
 There are allot many option to secure your entire server with IP security policy. You can create more rules to block every one on RDP port TCP 3389 and allow only select IPs. IP Security is IP and port based application and not Services based and you can create the rule as per your need.
Wednesday, 12 September 2012
Set up an IP Security Policy Rule for Windows 2008 and 2003

Tuesday, 11 September 2012
Install PHPMyAdmin on IIS7 and Server 2008
After installing our copy of MySQL on IIS7 and Server 2008,
you might be wondering what to do next. Well if you don’t feel like
learning the command line sequences for MySQL you might be interested in
using a web based GUI based tool which will make managing the databases
a lot easier.
This tool is called PHPMyAdmin and can be found at www.phpmyadmin.net.
What will you be able to do with PHPMyAdmin in the database? Here is a list of some of the features:
Note: PHPMyAdmin requires both PHP and MySql to be installed on the server.
The current version as I write this article is 2.11.9, so I am going to go ahead and download that to get started. Which version you use will depend on your environment; I am going to use the english.zip for this demo. Let’s get started!
1. Extract the files from the archive to a site that is available on the web server (remember the application is web based).
For this demo I am going to use C:\inetpub\wwwroot\phpmyadmin
 2. Now start IIS Manager and expand the default website; right click on phpmyadmin and left click on Convert to Application.

3. You can leave the default settings in place for the Add Application window and click OK.

4. Create a folder to save your PHP sessions; for our example I am going to use C:\temp\phpsessions and give full rights to the following users:
IUSR
IIS_IUSRS
Network Service
5. Now go into your php directory and find php.ini — we have to make a few changes:
Find session.save_path and set it to the same as you used in step 4 which in our case is C:\temp\phpsessions and save the file.

6. Please note that this application requires the following extensions for PHP:
MySQL
GD
MBSTRING
If you do not have these on your server already, please install them. If you are using my article to install PHP then in step 6 just add the above extensions to your installation, or if you already installed it rerun the installer msi file and modify your installation to include these extensions.
To check if they are installed do a search for extension=php_mysql in the php.ini and you should see it uncommented.
Do the same for the other extensions:
extension=php_gd2.dll
extension=php_mbstring.dll

7. Go into IIS Manager, go to the default site (that is if you have been following my demo, if you have been modifying your site location or path then use that) and click on Default Document.

8. In the right pane click Add…

9. In the dialog box type index.php and click Ok.

10. Go to the directory that you unzipped PHPMyAdmin to and look for a file named config.sample.inc.php and open it in Wordpad. (You can use notepad but it tends to jumble everything up)
11. Now find the line $cfg[‘blowfish_secret’] = ‘’; you have to fill in this line with anything that you want but it needs to be a value.
Only up to 46 characters and it can be alphanumeric. In this case I am going to use trainsignal1111TST

12. Go down to you see the section User for advanced features and uncomment (Remove the // from the front of the line) the two lines under that and change the pmapass to a different password, for this demo I am going to use trainsignal.

13. next, go down to the next section Advanced phpMyadmin features and uncomment all the lines under it (remove the // from the front of the line).

14. Now save this file as config.inc.php
15. Point your browser to http://localhost/phpmyadmin/ (if you have been following this example; if you have used a different site/directory then point to that) and you should see a login page.
Type in the userid and password for your local MySql server, then click Go.

16. Now you are in and able to manage your MySql instance!
As a quick test let’s create a database by scrolling to the Database link and clicking on it

17. Type in the name of your new database, for this example I am going to use Trainsignaltraining and then click Create.

18. You will now see a page that confirms that database Trainsignaltraining has been created.

That’s all there is to it, now you can quickly and easily manage you MySql databases on IIS7 through PHPMyAdmin.
This tool is called PHPMyAdmin and can be found at www.phpmyadmin.net.
What will you be able to do with PHPMyAdmin in the database? Here is a list of some of the features:
- browse and drop databases, tables, views, fields and indexes
- create, copy, drop, rename and alter databases, tables, fields and indexes
- maintenance server, databases and tables, with proposals on server configuration
- execute, edit and bookmark any SQL-statement, even batch-queries
- load text files into tables
- administer multiple servers
- create and read dumps of tables
- search globally in a database or a subset of it
Note: PHPMyAdmin requires both PHP and MySql to be installed on the server.
Download and Install PHPMyAdmin
Ok so now that we know why we should install it, let’s get to the actual installation part. But before we begin, let’s go download the software at: www.phpmyadmin.net/home_page/downloads.php.The current version as I write this article is 2.11.9, so I am going to go ahead and download that to get started. Which version you use will depend on your environment; I am going to use the english.zip for this demo. Let’s get started!
1. Extract the files from the archive to a site that is available on the web server (remember the application is web based).
For this demo I am going to use C:\inetpub\wwwroot\phpmyadmin
3. You can leave the default settings in place for the Add Application window and click OK.
4. Create a folder to save your PHP sessions; for our example I am going to use C:\temp\phpsessions and give full rights to the following users:
IUSR
IIS_IUSRS
Network Service
5. Now go into your php directory and find php.ini — we have to make a few changes:
Find session.save_path and set it to the same as you used in step 4 which in our case is C:\temp\phpsessions and save the file.
6. Please note that this application requires the following extensions for PHP:
MySQL
GD
MBSTRING
If you do not have these on your server already, please install them. If you are using my article to install PHP then in step 6 just add the above extensions to your installation, or if you already installed it rerun the installer msi file and modify your installation to include these extensions.
To check if they are installed do a search for extension=php_mysql in the php.ini and you should see it uncommented.
Do the same for the other extensions:
extension=php_gd2.dll
extension=php_mbstring.dll
7. Go into IIS Manager, go to the default site (that is if you have been following my demo, if you have been modifying your site location or path then use that) and click on Default Document.
8. In the right pane click Add…
9. In the dialog box type index.php and click Ok.
10. Go to the directory that you unzipped PHPMyAdmin to and look for a file named config.sample.inc.php and open it in Wordpad. (You can use notepad but it tends to jumble everything up)
11. Now find the line $cfg[‘blowfish_secret’] = ‘’; you have to fill in this line with anything that you want but it needs to be a value.
Only up to 46 characters and it can be alphanumeric. In this case I am going to use trainsignal1111TST
12. Go down to you see the section User for advanced features and uncomment (Remove the // from the front of the line) the two lines under that and change the pmapass to a different password, for this demo I am going to use trainsignal.
13. next, go down to the next section Advanced phpMyadmin features and uncomment all the lines under it (remove the // from the front of the line).
14. Now save this file as config.inc.php
15. Point your browser to http://localhost/phpmyadmin/ (if you have been following this example; if you have used a different site/directory then point to that) and you should see a login page.
Type in the userid and password for your local MySql server, then click Go.
16. Now you are in and able to manage your MySql instance!
As a quick test let’s create a database by scrolling to the Database link and clicking on it
17. Type in the name of your new database, for this example I am going to use Trainsignaltraining and then click Create.
18. You will now see a page that confirms that database Trainsignaltraining has been created.
That’s all there is to it, now you can quickly and easily manage you MySql databases on IIS7 through PHPMyAdmin.
Monday, 10 September 2012
Install MySQL on a Windows Server
The following article explains how to install MySQL on a Windows
Server. The process involves downloading the latest version of MySQL
directly to your Windows server and then installing the software. MySQL
is a free product. Once installed, you may begin creating and using
MySQL databases on your server.
 5.Click Next to begin the installation wizard.

6.Accept the License Agreement and click Next.

7.Select Typical Installation and click Next.

8.Click Install. The installation will take a few moments.

9.Click Next until you reach the Wizard Completed screen.
10.Check Configure the MySQL Server now and click Finish.

11.Click Next to begin the MySQL Server Instance Configuration Wizard.

12. Select Detailed Configuration and click Next.
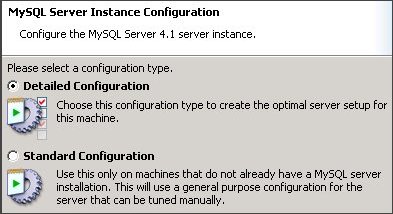
13.Select Multifunctional Database and click Next.

14.For InnoDB Tablespace Settings, leave the default settings and click Next.

15.Select Online Transaction Processing (OLTP) and click Next.

16.Check Enable TCP/IP Networking, leave the default Port Number and click Next.

17. Select Standard Character Set and click Next.

18.Check Install as Windows Service, uncheck Include BIN directory in Windows PATH and click Next.

19.Enter a password for your root user, uncheck Create an Anonymous Account and click Next.

20.Click Execute to complete the installation.
As mentioned earlier, I will assume that you have already set up PHP.
To install MySQL, please follow these steps:
- Log into your server through Terminal Services or Remote Desktop Connection.
- Open a Web browser and load http://dev.mysql.com/downloads/
- Download Windows (x86) ZIP/Setup.exe (there's no need to sign up. It is a free download).
- Unzip the file you downloaded above and run Setup.exe.
6.Accept the License Agreement and click Next.
7.Select Typical Installation and click Next.
8.Click Install. The installation will take a few moments.
9.Click Next until you reach the Wizard Completed screen.
10.Check Configure the MySQL Server now and click Finish.
11.Click Next to begin the MySQL Server Instance Configuration Wizard.
12. Select Detailed Configuration and click Next.
13.Select Multifunctional Database and click Next.
14.For InnoDB Tablespace Settings, leave the default settings and click Next.
15.Select Online Transaction Processing (OLTP) and click Next.
16.Check Enable TCP/IP Networking, leave the default Port Number and click Next.
17. Select Standard Character Set and click Next.
18.Check Install as Windows Service, uncheck Include BIN directory in Windows PATH and click Next.
19.Enter a password for your root user, uncheck Create an Anonymous Account and click Next.
20.Click Execute to complete the installation.
Modifying Your PHP Configuration to Allow Your PHP Scripts to Use MySQL
Now that you have a MySQL server running on your machine, you will probably want to set up PHP so that your scripts can access databases on the server.As mentioned earlier, I will assume that you have already set up PHP.
-
Open up your
php.inifile in Notepad. If you have followed the steps in my guide, you should already be familiar with how to do this. The file itself can be found inc:\php\php.ini(unless you have installed it elsewhere).
-
Look for the following line.
extension_dir = "./"Modify it so that it now looks like this:
extension_dir = "c:\php\ext"If you used my guide to set up PHP before, "c:\php\ext" is where the extensions were installed. Those who installed PHP in a different folder should of course put the correct path in theextension_dirsetting.
-
Now search for the following line:
;extension=php_mysql.dll(Be careful. It's surrounded by a number of lines that look very similar. Be sure you get the line that has "php_mysql.dll" and not "php_msql.dll", "php_mssql.dll" or "php_mysqli.dll".)
Remove the initial semi-colon (";") so that the line now looks like this:
extension=php_mysql.dll(A semi-colon indicates the start of a comment, which is ignored by the PHP interpreter. Removing it makes the line a configuration setting.)
-
Save the file and close Notepad.
-
Now start up Windows Explorer. That is, click the Start menu, followed
by "Computer". A window should open. Look for "System properties"
somewhere
near the top of the window. Click it. Then click "Advanced system
settings" in the left column. The Vista User Account Control
should appear. Click "Continue".
In the "System Properties" dialog box that appears, click the "Environment Variables" button. In the list box under "System variables", look for the line that has "Path" in the first column. Click it to select it. Click the "Edit" button.
A dialog box entitled "Edit System Variable" appears. Click somewhere in the "Variable value" line and use your arrow key to move to the end of the line (or just use the "End" key on your keyboard). Append the following:
;c:\php(Note: the above starts with a semi-colon and is followed by the directory/folder where you installed PHP.)
This adds "c:\php" to the "PATH" environment variable, which is basically a list of directories that Windows searches for when it needs to look for a program or components of a program. You need to do this because PHP needs it to load a file calledlibmysql.dll, located in that directory. For some reason, it doesn't seem to be able to do it if "c:\php" is not in the PATH (even though it's the same directory as the PHP program itself).
Once you have done this, restart your computer.
-
After you reboot your computer, a simple PHP script like the following
should be run to make sure that the PHP is able to load the
MySQL libraries (DLLs).
<?php phpinfo(); ?>Save the script as "test.php" in your "htdocs" directory and invoke it from your browser with "http://localhost/test.php". You should now be able to see a new section called "mysql" in the report. This means that PHP was successful in loading its MySQL-related libraries (the extension and libmysql.dll libraries).
Subscribe to:
Posts (Atom)