The following article explains how to install MySQL on a Windows
Server. The process involves downloading the latest version of MySQL
directly to your Windows server and then installing the software. MySQL
is a free product. Once installed, you may begin creating and using
MySQL databases on your server.
6.Accept the License Agreement and click Next.
7.Select Typical Installation and click Next.
8.Click Install. The installation will take a few moments.
9.Click Next until you reach the Wizard Completed screen.
10.Check Configure the MySQL Server now and click Finish.
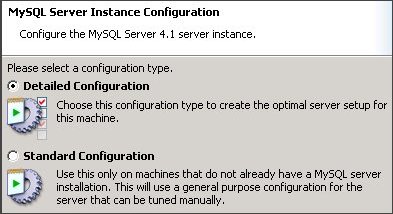
11.Click Next to begin the MySQL Server Instance Configuration Wizard.
12. Select Detailed Configuration and click Next.
13.Select Multifunctional Database and click Next.
14.For InnoDB Tablespace Settings, leave the default settings and click Next.
15.Select Online Transaction Processing (OLTP) and click Next.
16.Check Enable TCP/IP Networking, leave the default Port Number and click Next.
17. Select Standard Character Set and click Next.
18.Check Install as Windows Service, uncheck Include BIN directory in Windows PATH and click Next.
19.Enter a password for your root user, uncheck Create an Anonymous Account and click Next.
20.Click Execute to complete the installation.
As mentioned earlier, I will assume that you have already set up PHP.
To install MySQL, please follow these steps:
- Log into your server through Terminal Services or Remote Desktop Connection.
- Open a Web browser and load http://dev.mysql.com/downloads/
- Download Windows (x86) ZIP/Setup.exe (there's no need to sign up. It is a free download).
- Unzip the file you downloaded above and run Setup.exe.
6.Accept the License Agreement and click Next.
7.Select Typical Installation and click Next.
8.Click Install. The installation will take a few moments.
9.Click Next until you reach the Wizard Completed screen.
10.Check Configure the MySQL Server now and click Finish.
11.Click Next to begin the MySQL Server Instance Configuration Wizard.
12. Select Detailed Configuration and click Next.
13.Select Multifunctional Database and click Next.
14.For InnoDB Tablespace Settings, leave the default settings and click Next.
15.Select Online Transaction Processing (OLTP) and click Next.
16.Check Enable TCP/IP Networking, leave the default Port Number and click Next.
17. Select Standard Character Set and click Next.
18.Check Install as Windows Service, uncheck Include BIN directory in Windows PATH and click Next.
19.Enter a password for your root user, uncheck Create an Anonymous Account and click Next.
20.Click Execute to complete the installation.
Modifying Your PHP Configuration to Allow Your PHP Scripts to Use MySQL
Now that you have a MySQL server running on your machine, you will probably want to set up PHP so that your scripts can access databases on the server.As mentioned earlier, I will assume that you have already set up PHP.
-
Open up your
php.inifile in Notepad. If you have followed the steps in my guide, you should already be familiar with how to do this. The file itself can be found inc:\php\php.ini(unless you have installed it elsewhere).
-
Look for the following line.
extension_dir = "./"Modify it so that it now looks like this:
extension_dir = "c:\php\ext"If you used my guide to set up PHP before, "c:\php\ext" is where the extensions were installed. Those who installed PHP in a different folder should of course put the correct path in theextension_dirsetting.
-
Now search for the following line:
;extension=php_mysql.dll(Be careful. It's surrounded by a number of lines that look very similar. Be sure you get the line that has "php_mysql.dll" and not "php_msql.dll", "php_mssql.dll" or "php_mysqli.dll".)
Remove the initial semi-colon (";") so that the line now looks like this:
extension=php_mysql.dll(A semi-colon indicates the start of a comment, which is ignored by the PHP interpreter. Removing it makes the line a configuration setting.)
-
Save the file and close Notepad.
-
Now start up Windows Explorer. That is, click the Start menu, followed
by "Computer". A window should open. Look for "System properties"
somewhere
near the top of the window. Click it. Then click "Advanced system
settings" in the left column. The Vista User Account Control
should appear. Click "Continue".
In the "System Properties" dialog box that appears, click the "Environment Variables" button. In the list box under "System variables", look for the line that has "Path" in the first column. Click it to select it. Click the "Edit" button.
A dialog box entitled "Edit System Variable" appears. Click somewhere in the "Variable value" line and use your arrow key to move to the end of the line (or just use the "End" key on your keyboard). Append the following:
;c:\php(Note: the above starts with a semi-colon and is followed by the directory/folder where you installed PHP.)
This adds "c:\php" to the "PATH" environment variable, which is basically a list of directories that Windows searches for when it needs to look for a program or components of a program. You need to do this because PHP needs it to load a file calledlibmysql.dll, located in that directory. For some reason, it doesn't seem to be able to do it if "c:\php" is not in the PATH (even though it's the same directory as the PHP program itself).
Once you have done this, restart your computer.
-
After you reboot your computer, a simple PHP script like the following
should be run to make sure that the PHP is able to load the
MySQL libraries (DLLs).
<?php phpinfo(); ?>Save the script as "test.php" in your "htdocs" directory and invoke it from your browser with "http://localhost/test.php". You should now be able to see a new section called "mysql" in the report. This means that PHP was successful in loading its MySQL-related libraries (the extension and libmysql.dll libraries).


No comments:
Post a Comment