Introduction
You can use Microsoft® Web Platform Installer (Web PI) to easily install Internet Information Services (IIS) and applications that run on IIS. However, if you choose to install IIS manually, you can use this article for guidance.
IIS 7.0 is the Web server role in Windows Server® 2008 and the Web server in Windows Vista®. IIS 7.5 is the Web server role in Windows Server® 2008 R2 and the Web server in Windows® 7. Windows Server 2008 R2 and Windows Server 2008 operating systems have all the IIS features needed to support the hosting of Web content in production environments. Windows 7 and Windows Vista also include IIS features, but the available features depend on the operating system versions.
Before You Begin
Ensure that you have administrative user rights on the computer on which you plan to install IIS 7. Note that by default, you do not have administrative user rights if you are logged on as a user other than as the built-in administrator, even if you were added to the local Administrators group on the computer (this is a new security feature in Windows Server 2008 called Local User Administrator).
Install IIS 7.5 on Windows Server 2008 R2
IIS is one of the Windows Server® server roles. IIS 7 can be installed through the graphical user interface (GUI) by using the new Server Manager interface after the Windows Server operating system is installed.
Server Manager provides a single dashboard to install or uninstall server roles and features. Server Manager also gives an overview of all currently installed roles and features. When IIS 7 is chosen from the Server Manager, the basic components and services needed for IIS are automatically selected.
1. Click Start -> All Programs -> Administrative Tools -> Server Manager.
2. In the Server Manager window, scroll down to Roles Summary, and then click Add Roles. The Add Roles Wizard will start with a Before You Begin page. The wizard asks for verification of the following:
a. The administrator account has a strong password.
b. The network settings, such as IP addresses, are configured.
c. The latest security updates from Windows® Update are installed.
3. Select Web Server (IIS) on the Select Server Roles page. An introductory page will open with links for further information.
Note: When you use the Add Roles Wizard to install IIS, you get the default installation, which has a minimum set of role services. If you need additional IIS role services, such as Application Development or Health and Diagnostics, make sure to select the check boxes associated with those features in the Select Role Services page of the wizard.
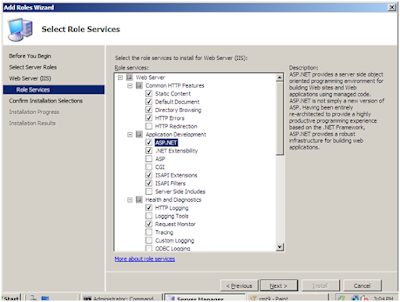
4. Select the IIS services to be installed on the Select Role Services page. Add only the modules necessary. In this case, ASP.NET is selected, and a description of ASP.NET appears in the right pane. Once desired modules are added, click Next.
5. Add any required role services.
6. IIS is now installed with a default configuration for hosting ASP.NET on Windows Server. Click Close to complete the process.
7. Confirm that the Web server works by using http://localhost.
Note: Install only the absolutely necessary IIS services to minimize the IIS installation footprint. This also minimizes the attack surface, which is one of the benefits of IIS 7.
1. To start Server Manager, click Start Menu -> All Programs -> Administrative Tools -> Server Manager. The Server Manager window opens
Install IIS 7.0 on Windows Server 2008
1. To start Server Manager, click Start Menu -> All Programs -> Administrative Tools -> Server Manager. The Server Manager window opens
2. In the Server Manager window, select Roles. The Role Summary View is displayed.
3. Click Add Roles. The Add Roles Wizard opens. Click Next to select roles to install.
4. Select Web Server (IIS).
5. The Add Roles Wizard notifies you of any required dependencies; since IIS depends on the Windows Process Activation Service (WAS) feature, the following informational dialog box appears. Click Add Required Role Services to continue.
6. The Web Server is now selected for install. The Select Server Roles dialog box opens. Click Next to continue.
7. The following dialog box and information appears. Click Next to continue.
8. The Add Roles Wizard displays a list of all IIS 7.0 features available to install as shown below. Note that features comprising the default install are pre-selected.
9. To install just the IIS 7.0 default features, click the Install button, and then proceed to Step 14. If you need to install additional features, proceed to step 10.
10. For this example, we install additional IIS features. Select the check box for ASP.NET. The Wizard warns if adding an IIS feature will also cause other features to be installed.
11. Click Add Required Role Services to continue.
12. Continue selecting additional IIS Role Services features to install.
 13. When you have selected all the features you require, click Next to continue.14. The Wizard provides a summary of what will be installed.
15. Click Install to continue. The Installation Progress dialog box opens.
16. When the IIS 7.0 installation is complete, the following dialog box opens. Click Close to return to the Server Manager.
17. You can now perform a quick check to verify that IIS 7.0 is installed. Start the Windows® Internet Explorer® Web browser, and enter the addresshttp://localhost. You should see the default IIS "Welcome" page.


No comments:
Post a Comment